This professional digital device provides reliable communication for modern businesses. It integrates seamlessly into corporate environments, offering streamlined connectivity and efficient call management tools to enhance overall productivity within your office workspace now.
Key Features of the KX-DT343 Digital Phone
The KX-DT343 stands out due to its versatility and robust build. One primary highlight is the inclusion of flexible controls, allowing users to tailor their most frequent functions for rapid access. The crystal-clear digital audio ensures that every conversation remains professional and intelligible, minimizing background noise during critical business discussions. Furthermore, the intuitive interface facilitates seamless multitasking, enabling users to manage multiple lines simultaneously without confusion. The device features a high-contrast display that provides essential caller information at a glance, reducing the time spent identifying incoming parties. Additionally, its compatibility with a wide range of Panasonic PBX systems ensures a stable connection and reliable performance. The phone also supports advanced call routing options, ensuring that communication flows efficiently across different departments. By combining durability with sophisticated digital technology, this handset serves as a powerful tool for enhancing internal coordination. These integrated capabilities make it an ideal choice for administrative staff who require a dependable, feature-rich terminal for daily operations. It truly optimizes corporate communication flow effectively now.
Technical Specifications Overview
The hardware architecture of this digital terminal is engineered for precision and longevity. It operates on a proprietary digital signaling protocol, ensuring low latency and high security across the internal network. The integrated LCD screen employs a high-resolution monochrome matrix, providing clear visibility from various angles. Power is delivered directly through the system cable, eliminating the need for external adapters at each desk. In terms of physical build, the chassis is constructed from high-grade industrial plastics, designed to withstand constant daily usage in high-traffic office settings. The device supports a specific voltage range compatible with standardized Panasonic PBX systems, maintaining stable current flow for consistent performance. Audio transmission is handled via a high-fidelity handset and a full-duplex speakerphone, both optimized for voice frequency clarity; The internal memory allows for the storage of extensive directories and personalized settings. These technical parameters ensure that the device maintains peak operational efficiency while integrating perfectly into existing telephony infrastructures without requiring complex hardware modifications or additional peripheral equipment today for users.

Getting Started with the KX-DT343
Starting with your new digital terminal involves several important steps to ensure the best performance. This chapter provides the necessary guidance to make your business communication system fully operational and ready very quickly.
Unboxing and Hardware Components
When you first open the packaging, carefully remove the main chassis and the handset. Ensure that all protective films are peeled off to maintain a clean appearance. Inside the box, you will find the following essential physical components:
- The digital telephone terminal unit
- The ergonomic handheld receiver
- A high-quality coiled handset cord
- The adjustable desktop stand
- Basic documentation and safety guides
Inspect every item for any signs of shipping damage before proceeding. The chassis features a sturdy build designed for heavy daily usage in corporate settings. The handset is designed for comfort during long conversations, fitting securely into its cradle. Pay close attention to the connection ports located on the rear of the base, where the handset cord attaches securely. By organizing these parts on your desk, you prepare the workspace for the subsequent installation process. All hardware elements are crafted to ensure long-term durability and consistent performance throughout the entire operational lifespan of your professional communication system today for every single user who operates it now.
Connecting the Phone to the PBX System
To link your device to the central PBX, start by locating the digital line port on the rear panel. Use the proprietary Panasonic digital cable provided for this purpose. Connect one end of the cable firmly into the phone network port and the other end into the designated extension jack on the wall or the PBX hardware. Ensure you hear a distinct click, indicating that the connector is locked in place. This particular connection is crucial as it delivers both the communication signal and the power required for the unit to function. Avoid bending the cable sharply to prevent internal wire damage. Once it is plugged in, the device will attempt to communicate with the system. Verify that the cable is not pinched by furniture or the desk. This physical link establishes the communication path necessary for the system to recognize the extension. Proper cabling prevents intermittent signal loss and ensures a stable connection for all digital voice traffic across the entire professional office network infrastructure architecture.
Initial Setup and Configuration
Once the phone is powered on, the system initiates a boot sequence. You will see the display light up. Begin by accessing the system menu to adjust basic preferences. First, navigate to the date and time settings to ensure all call logs are accurate. Use the navigation controls to adjust the hour and minute. Next, check the volume levels for the handset and speakerphone to suit your environment. Ensure that the display brightness is set to a comfortable level for your eyesight. If the system prompts for a password, enter the administrative code provided by your network manager. Verify that the extension number appears correctly on the screen, confirming the PBX has assigned the identity. You might also want to adjust the ringer tone and volume to ensure calls are audible in your office; This initial phase prepares the handset for daily use by tailoring the interface to the user. Confirm all settings by pressing the save or enter button before exiting the configuration menu completely now.

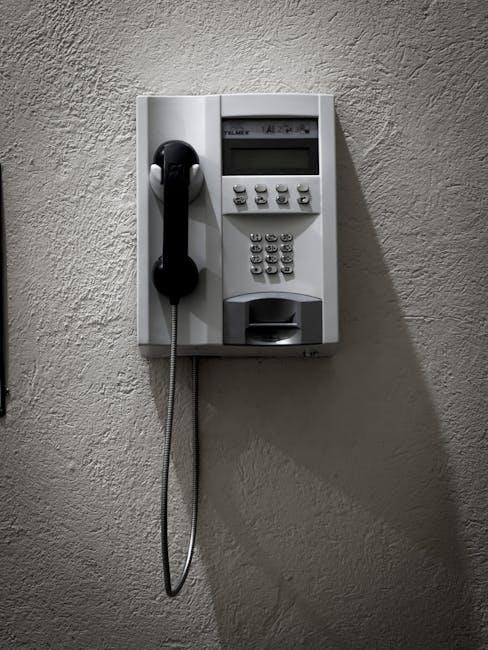
Understanding the Layout and Buttons
This section examines the overall physical design of the device. It highlights how the buttons are organized logically to ensure that users can navigate the interface quickly and efficiently during their daily workday.
Functionality of Programmable Keys

The programmable keys on this digital terminal offer incredible versatility for the end user. These flexible buttons allow you to assign specific functions tailored to your unique business requirements. By utilizing these keys, you can create shortcuts for frequently dialed internal extensions, which eliminates the need to remember long numbers. Additionally, these buttons can be mapped to external contacts or specific system commands, providing one-touch access to essential communication tools. When organizing these keys, the user can designate them as quick access or direct line access buttons, depending on the PBX system settings. This customization ensures that the most critical actions are always within immediate reach, significantly reducing the time spent navigating complex menus during busy periods. The ability to personalize the interface means that each employee can optimize their workflow based on their specific role. By maximizing the utility of these programmable options, the office achieves a higher level of efficiency and reduces the likelihood of dialing errors during urgent calls today. This improves company flow.
Using the Numeric Keypad and Soft Keys
The numeric keypad serves as the primary input method for dialing numbers and entering system codes. Its layout is standard, ensuring that users can quickly punch in digits without hesitation. Each key provides tactile feedback, which helps prevent input errors during rapid dialing. Beside the numbers, the soft keys play a crucial role in interacting with the system’s dynamic interface. Unlike the fixed buttons, soft keys change their function based on the current state of the display. For example, during an active call, these buttons might offer options like “Mute” or “Flash,” whereas in the standby mode, they might guide you through a menu. This contextual design allows the device to offer a wealth of features without cluttering the physical surface with too many buttons. By combining the precision of the numeric pad with the flexibility of the soft keys, the user gains full control over the device’s operational modes. This synergy simplifies the overall user experience and speeds up daily communication tasks significantly. It is helpful.
Managing the LCD Display
The screen is the central hub for visual feedback. It displays critical information such as the date, time, and current line status. Users can easily monitor who is calling via the Caller ID feature, which shows the name or number of the incoming party. To ensure readability in various lighting conditions, the display offers adjustable contrast settings. By accessing the internal menu, you can modify the brightness to reduce eye strain or improve visibility in bright rooms. The interface is designed to be intuitive, using clear text and icons to indicate the status of active calls or pending messages. Navigating the visual cues helps users understand which function is currently active. Additionally, the screen provides prompts that guide the user through complex processes, reducing the need for constant manual reference. Regular maintenance of the screen surface prevents scratches and maintains clarity. Understanding how to interpret the symbols shown on the panel is essential for maximizing the utility of this specific professional hardware tool used daily in offices.

Basic Operation Guide
This section provides a comprehensive overview of the essential functions required for daily usage. Learn how to navigate the primary controls to ensure a smooth communication experience within your professional office environment today.
Making and Receiving Internal Calls
To initiate an internal conversation, simply lift the handset or press the speakerphone button. Once you hear the dial tone, enter the specific extension number of the colleague you wish to contact. If the line is busy, you will hear a busy signal. To receive an incoming internal call, the phone will ring, and the screen will display the caller’s identity. You can answer by lifting the handset or pressing the speaker button. For a hands-free experience, the speaker function allows you to communicate without holding the device. When the conversation is complete, press the hook switch or the speaker button again to disconnect the line and return to the idle state. These basic steps ensure that communication remains fluid and efficient across different departments. Maintaining clear internal channels is vital for organizational success. Ensure that all users are familiar with these simple steps to maximize the utility of the system while minimizing errors during high-traffic periods within the bustling corporate office setting found here right now.
Placing External Calls

To place an external call using this digital terminal, first lift the handset or activate the speaker button to access a dial tone. Depending on your PBX configuration, you must typically dial a specific access code, such as nine, to reach an outside line. Once the outside line is active, carefully enter the full telephone number, including the necessary area codes or international prefixes if required for the destination. If you encounter a fast busy signal, it might indicate that all available external trunks are currently occupied by other users in your office. Wait for a moment and try again. During the call, you can utilize the volume keys to adjust the audio levels for better clarity. Once your external communication is finished, press the hook switch or the speaker button to terminate the connection. Following these precise steps ensures that your business remains connected with clients and partners globally. This process is straightforward and ensures that your external outreach is handled professionally every single time today.
Using Call Transfer and Hold Functions
To put an active call on hold, press the dedicated HOLD button. The corresponding line key will flash, indicating the caller is waiting. To resume, simply press the flashing key again. Transferring calls requires a few more steps to ensure a smooth transition. First, while on the call, press the TRANSFER button. This places the external party on a temporary hold. Next, dial the extension number of the colleague you wish to reach. You can either perform a blind transfer by pressing the transfer button again immediately or an attended transfer by speaking with the recipient first to announce the caller. Once the recipient answers or you decide to send the call, press the button to complete the handoff. These features allow for a professional handling of incoming requests, ensuring that clients are directed to the correct department without unnecessary delays. Mastering these functions improves office efficiency and caller satisfaction, making the communication flow much smoother for everyone involved in the daily business operations here right now.

Advanced Phone Features

Explore the sophisticated capabilities of this electronic terminal. These complex utilities provide extensive control over system mechanics, ensuring that your company interaction remains agile, flexible, and perfectly tailored to your expert specific needs.
Configuring Speed Dialing
Setting up rapid access numbers allows users to reach frequent contacts instantly without manually dialing long sequences. To begin this process, access the programming mode by pressing the designated function key on your console. Once the system enters the configuration state, select a specific programmable button that you wish to assign for this purpose. Carefully enter the target telephone number using the numeric keypad, ensuring every digit is correct. After inputting the sequence, press the save or enter button to lock the entry into the internal memory. You can repeat these steps for multiple keys to create a comprehensive list of shortcuts for your most important clients or colleagues. This efficiency reduces errors and saves valuable time during busy work hours. By organizing your favorite extensions in this manner, you optimize your workflow and ensure that critical communication happens swiftly. Always verify that the programmed number is active by performing a test call immediately after the setup is completed to ensure total operational accuracy for all users.

Setting Up Call Forwarding
Call forwarding is a vital tool for maintaining connectivity when you are away from your desk. To enable this feature, start by accessing the phone’s internal menu system. Navigate through the options until you find the forwarding settings. You can choose between several modes, such as forwarding all incoming calls or only those that go unanswered. Once you have selected your preferred mode, carefully enter the destination phone number where the calls should be redirected. This could be another internal extension or an external mobile number. After typing the digits, press the confirmation button to activate the service. To deactivate the feature, return to the same menu and select the cancel or disable option. This ensures that calls return to your device normally. Using this function prevents missed opportunities and ensures that your clients always reach a representative. It is a simple yet powerful way to manage your availability without interrupting the flow of business operations throughout the entire corporate office structure today. It facilitates total communication.

Troubleshooting Common KX-DT343 Issues
Encountering technical difficulties with your digital telephone can be frustrating. This section provides an overview of how to address various operational problems to ensure your communication system remains stable and fully functional daily.
Identifying Error Codes and Signal Problems
When the display shows unusual alphanumeric symbols, it indicates a specific system fault. These error codes help administrators pinpoint whether the issue resides within the physical wiring or the central exchange settings. For instance, a signal loss might manifest as a blank screen or a specific blinking indicator, suggesting that the connection between the device and the PBX is interrupted. Users should check for static or audible noise during conversations, as this often points to electromagnetic interference or severely damaged cables. If a specific error digit appears, consult the system logs to identify the exact nature of the failure. Identifying these patterns early prevents prolonged downtime and ensures that technical support can resolve the complex glitch rapidly. Pay close attention to the flashing patterns of the status LEDs, as they often mirror the error codes seen on the screen. Understanding these signals allows for a quicker diagnosis of network instability, ensuring that your corporate communication remains crystal clear and uninterrupted throughout the entire busy business operating day.
Resetting the Phone to Factory Settings
Restoring the Panasonic KX-DT343 to its original factory state is a critical process when software glitches occur or when reassigning the hardware to a different user. To initiate this procedure, the administrator must access the system programming mode through the main PBX console. Since this is a digital proprietary phone, most reset options are managed centrally rather than through a physical button on the handset itself. Once the specific extension is targeted in the system menu, the “Initialize” command clears all personalized settings, including custom key assignments and user preferences. This action wipes the memory clean, removing any lingering configurations that might cause operational conflicts. After the reset is complete, the device will reboot and await new instructions from the server. It is essential to back up any necessary data before performing this wipe, as the process is irreversible. Following these steps ensures that the hardware starts with a clean slate, eliminating software corruption and restoring the device’s default operational stability for the next office operator now.
Finding the Official English Manual
Locating the official English documentation for the Panasonic KX-DT343 is essential for ensuring the hardware is used correctly and maintained properly over time. The primary source for these documents is the official Panasonic global support portal, where users can browse through the product archives. By entering the specific model number into the search bar, administrators can download the comprehensive PDF guide. This document provides the definitive instructions required for complex installation and daily usage. If the official website is unavailable, authorized Panasonic business partners often provide digital copies to their clients. It is highly recommended to avoid unofficial third-party sites to prevent downloading outdated or incorrect versions of the manual. Having the correct English version allows for a precise understanding of the system’s capabilities and ensures that all configurations are performed according to the manufacturer’s strict standards. Always verify that the downloaded file matches the exact hardware revision of your phone to avoid confusion during the operational phase of your telecommunications setup today for maximum operational efficiency.